Official Luthiers Forum!
http://www-.luthiersforum.com/forum/

Neck joint fitting frustration (pics)
http://www-.luthiersforum.com/forum/viewtopic.php?f=10102&t=6885
Page 1 of 1

Author:  Pete Harrington [ Sat May 27, 2006 12:20 pm ]
Post subject: 

Hello,

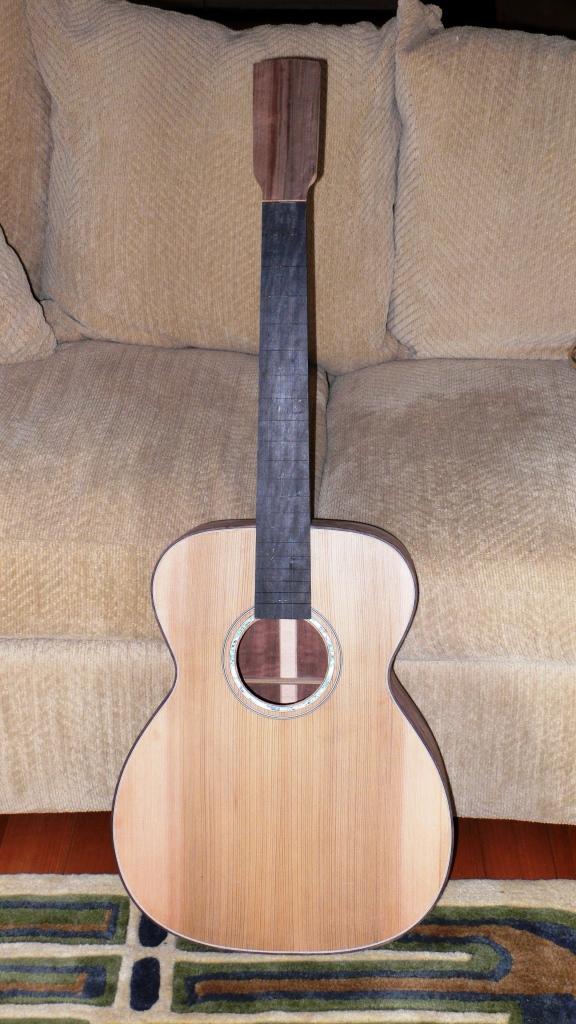
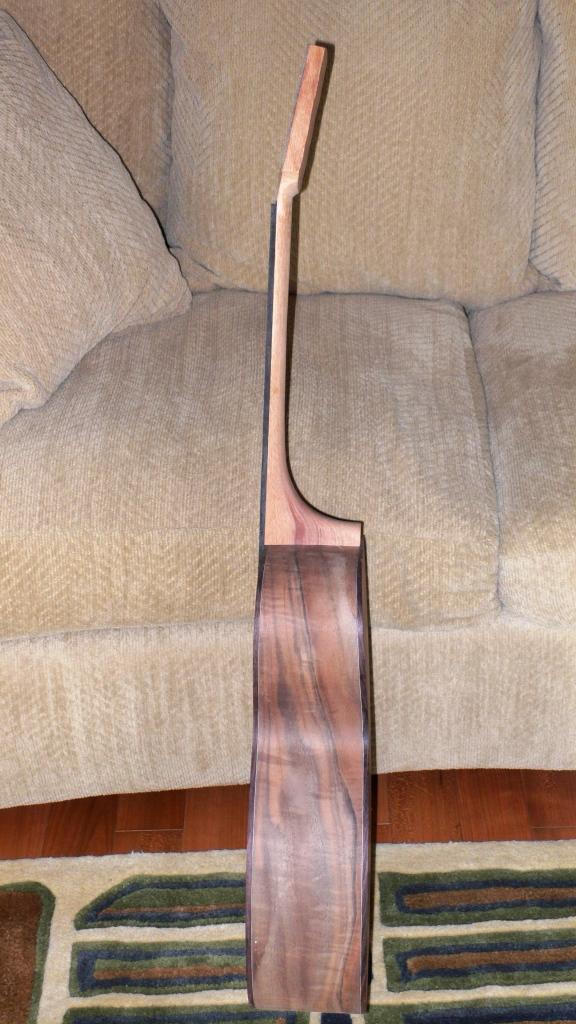
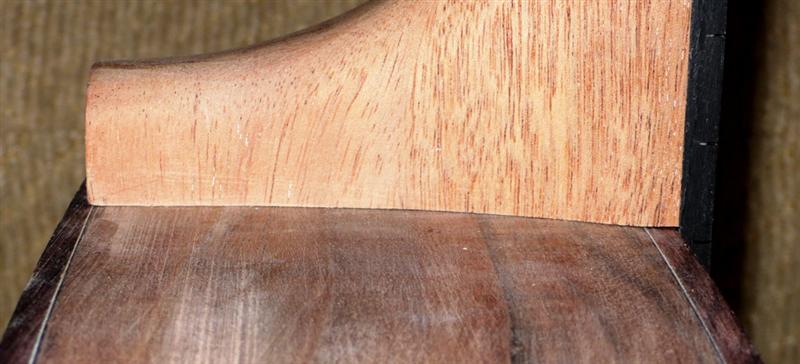
Well, I've been trying to get a good fit between the neck and the body, and I am having a heck of a time. I've made sure the body is dead flat (top to back) where the neck sits, but as you can see below, I can't for the life of me get a good joint.

One side fits better than the other, and this may provide a clue as to what's happening.

Do you guys have any tips? Man, I'm taking a break for tonight.

Thanks in advance,

Pete


Author:  Pwoolson [ Sat May 27, 2006 12:27 pm ]
Post subject: 

Are you using the floss method? Let us know what your method is and maybe that will shed some light on some advice.

Author:  Daniel M [ Sat May 27, 2006 12:38 pm ]
Post subject: 

Hey Pete;
It can be REALLY frustrating trying to get a good fit at this joint.
It's hard to tell from the pics, but the sides don't look quite flat to me. Use a good light source & a straight edge to check the body for flat.
It's way too easy to oversand the edges & end up with a big gap at the bindings. You have to glue sandpaper to a FLAT block to prevent sanding dips in the softer sections of the wood.
John Mayes makes fitting the neck look easy on his video using self adhesive sandpaper stuck to the body. The video is worth every penny!
Maybe he'll be nice & post a pic or two.
Good Luck, & don't lose hope!Daniel M38864.9025

Author:  Pete Harrington [ Sat May 27, 2006 12:41 pm ]
Post subject: 

Hi Paul,

Well, I was using the method I saw on John Mayes' video where a sticky backed piece of sandpaper (100 grit in this case) is adhered to the body and the neck is slid in and out, effectively transferring the body shape to the neck proper.

Unfortunately, after shaping the neck, I had the angle wrong (tenon cut by hand) and had to cut/chisel the relief angle after the fact, until it was close enough. Now,I can't seem to get anywhere close to a good fit. I'm back cutting the neck so only about 1/8th of an inch is contact with the body.

I may just have to approach this with clear head.

Pete


Author:  Pete Harrington [ Sat May 27, 2006 12:45 pm ]
Post subject: 

Thanks Daniel,

I was composing as you posted. Yes, John's videos wonderful. I think I started to go wrong by not building a jig.

I will double check the flatness of sides, good point.

It may be a case of inexperience rearing its ugly head!!

Pete

Author:  RichB [ Sat May 27, 2006 12:52 pm ]
Post subject: 

Pete, I am having a little trouble w/ the same thing on my build, so you're not alone. It's looks so much better if it's dead-on. I am curious as to what the other members will have to say on this. My first thought would be to try and remedy it w/ the way F. Ford shows it, being careful to keep the alignment correct.
http://www.frets.com/FRETSPages/Luthier/Technique/Guitar/Nec kReset/00028Reset/00028ResetViews/00028reset32.jpg

Author:  rich altieri [ Sat May 27, 2006 12:52 pm ]
Post subject: 

Pete:

I use the same method, however I take a little off near the tenion so you have sort of a taper allowinig the outside edges to serve as a bearing and not the entire flat surface. Not sure if this is clear. Let me know and maybe I can post a picture or drawing

Author:  Pete Harrington [ Sat May 27, 2006 1:02 pm ]
Post subject: 

Hesh,

Good advice, I think I understand what your describing, similar to what RichB posted (thanks Rich). I'll definitely check out the StewMac website.

RichB,

Thanks for the link. You know, I've had his website bookmarked for a while now, I just need to visit it more often (I even got the CD of the website!) I'd better start using the resources!

Rich A. ,

I think I can visualize what you're describing and it makes good sense. I've been doing that, but perhaps a bit conservatively.

I'm trying to get in the ballpark at this stage, with final fitting after the finish is applied.

I think I'll spend some more quality time with it!

Pete


Author:  paul harrell [ Sat May 27, 2006 1:27 pm ]
Post subject: 

   Also, when you are using the floss tecnique you end up with a little bit of the heel cap, right in the center ( or the part of the neck heel where the heel cap goes if you haven't glued it on yet) that does not get sanded and can hold the neck heel away from the body. After sanding a few strokes on each side, take a small sanding block, or a chisel and get rid of that little nub in the center of the heel cap, and sometimes that is all that is preventing the neck from pulling up tight to the sides. But, as has already been stated, the first order of business is getting the sides flat or nothing will work.

                          Paulpaul harrell38864.937650463

Author:  crazymanmichael [ Sat May 27, 2006 1:44 pm ]
Post subject: 

i hate to be contradictory (i don't really, i'm just trying to be a little bit tactful) but the truly great advantage of the "floss" method mentioned by many and shown in the photo from frank ford's site is that the sides do not have to be perfectly flat. because you are sliding the sandpaper between the side and the neck heel, the paper will profile the heel to fit the side.

a comment should be made on the "best paper" for the task, i.e., the gold adhesive backed plastic sanding film which i believe is mylar. granted you have to remove the psa with thinners or whatever, but the plastic slips so readily and doesn't tear or break that it is worth the extra cost and effort. particularly so if you do repairs and have to reset a lot of necks. crazymanmichael38865.4066319444

Author:  Bill Greene [ Sat May 27, 2006 2:16 pm ]
Post subject: 

Yes, if it isn't too much trouble...could some of you post the kinds of sandpapers you're using, and where you purchase them. Thanks.

Author:  Andy Zimmerman [ Sat May 27, 2006 2:54 pm ]
Post subject: 

I use the floss method also. Doing it Johns way seems to only work if you
have a flat sides. Sliding the neck back and forth across the side tends to
change the point in which the neck touches the sides. Clearly the floss
method works best because it only sands exactly where the neck is
supposed to fit on the sides.

Another trick. I don't use regular sand paper. I hold the neck hard against
the body and slide the sandpaper out. But this tends to rip the sandpaper. I
use cloth backed sandpaper and it doesnt tear. Also it fit the slightly
irregular shape of the side better.

Author:  CarltonM [ Sat May 27, 2006 2:59 pm ]
Post subject: 

Pete,

That's gonna be a nice guitar when you get it all together! Be patient.

It's clear from your photos that it's your heel that's not flat at this point. I can see undulations where it meets the body, on both sides. By all means, though, check that the body is flat and proceed from there. From what you wrote, it sounds like you had the joint right, using the Mayes method, before you tried adjusting the angle. Can you try that again? Just be sure you don't rock the neck while moving it against the sandpaper.

BTW, I don't think you can use the floss method here, because your fingerboard is already attached. You'd sand off much more on the bottom of the heel than at the top--great for a neck reset, but bad if you've got enough angle now.CarltonM38865.0018055556

Author:  Sprockett [ Sat May 27, 2006 3:00 pm ]
Post subject: 

Hesh has it right, here are the steps I use to fit a neck:

1. Sand flat the area the heel will sit on (the body), I use a machinists level to get it *perfectly* flat, you can't go on without this being right. Use a raking light to make sure your flat in this area.

2. Once you have this done take a file or sanding block and relieve the edges around the tenon, this will make sure that your neck will sit on the body and not get caught on the edges of the mortise joint.

3. I attach 150 grit sandpaper with an adhesive back onto the body and slowly move the neck back and forth checking for square and a flat fit.

There are three things your checking for when doing this:

1. A flat fit on both cheeks.

2. A square neck to the centerline of the top.

3. The right set angle for the neck.

Take your time and check your results often, don't be surprised if you have to re-attach sandpaper a couple of times to get it right. Also make sure you necks not catching on the tenon (like bottoming out), this can make you go nuts and say things that would make a sailor blush (trust me, I made myself blush one day )

Just be patient, it took me a while to get where I could do this without getting mad

Cheers

-Paul-

Author:  Dave White [ Sat May 27, 2006 8:37 pm ]
Post subject: 

For the "flossing" I cut thin strips of my normal 120 grit sandpaper and then tape a strip of the LMI/Stew Mac brown tape that I use for binding. Gives strength and slides nicely. This is also useful when you are sanding the back of the neck.

Author:  Colin S [ Sat May 27, 2006 8:49 pm ]
Post subject: 

[QUOTE=Dave White] For the "flossing" I cut thin strips of my normal 120 grit sandpaper and then tape a strip of the LMI/Stew Mac brown tape that I use for binding. Gives strength and slides nicely. This is also useful when you are sanding the back of the neck.[/QUOTE]

Good tip Dave.

Pete, It looks as if the body isn't flat start with that and fitting the neck becomes much easier.

Colin

Author:  Martin Turner [ Sat May 27, 2006 8:56 pm ]
Post subject: 

Pete,

There seems to be quite a a curve on the sides of your guitar....or am I
just seeing things?

Cheers Martin


Author:  Pwoolson [ Sat May 27, 2006 10:16 pm ]
Post subject: 

Pete, here's my .o2$ worth.
First, you don't necessarily need to have the side perfectly flat if you are flossing. BUT you'll want to remove those scratches at some point and that point is before you fit the neck or you're going to screw up your work. As long as you are sanding scratches out you may as well go for flat as that will make life easier.
I use finer grit paper that most here for two reasons. It slides out easier without "chatter", and it doesn't allow me to screw anything up as quickly. I usually use 240 cloth backed abrasive that is left over from my sanding belt rolls.
the first thing to do is set your center. Draw a line at the bridge location right on the center line. then with a long straight edge, project the line from the base side of the fingerboard and draw that line on your top. Do the same for the trebel side. Chances are that they won't be dead on. If your trebel side line is closer to the center line, you need to remove material from the trebel side of the heal. It works the same way on the bass side.
Now, you have the center set, you need to check angle. figure out where the right angle is and scribe a line on the cheeks as to what the 'proper' angle should look like. Then floss the material off until it is parallel with the scribed lines. I do this in 5 stroke sessions. 5 on the right, 5 on the left, check things. Keep things in mind like the fact that you have to put equal pressure on the sides as you are pulliing paper or you will remove more or less material.
As someone said before, the heal cap area can cause problems. So after each session (5 strokes each side) I do a couple in the middle of the heal cap.
That's about it. It sounds easier when you read it than it really is. Have patience. Make sure you are pulling the paper straight out and not up or down slightly as that will screw things up very quickly.
Good luck.

Author:  Serge Poirier [ Sat May 27, 2006 10:39 pm ]
Post subject: 

Whatever you do Pete, good luck with the fixin', let us know how it goes, your guitar will look great BTW!

Serge

Author:  L. Presnall [ Sun May 28, 2006 1:21 am ]
Post subject: 

There's a new way to advertise a guitar..."with all the fixin's! Not alacarte like those other builders...somehow getting all the fixins seems like a better deal! And boy, do my guitars have fixins!

Author:  Pete Harrington [ Sun May 28, 2006 3:01 am ]
Post subject: 

Hi All,

Wow, thanks for the responses and advice!

Flatness of sides, finish sanding, floss method and remember to GO SLOW will all be incorporated sometime this holiday weekend!!

Thanks again, I really appreciate the help,

Pete

PS I did check my sides again this morning and you guys were spot on - not flat but wavy, especially near the bindings. Sometimes we get lose sight of trees for the forest! Pete Harrington38865.5411574074

Page 1 of 1 All times are UTC - 5 hours
Powered by phpBB® Forum Software © phpBB Group
http://www.phpbb.com/